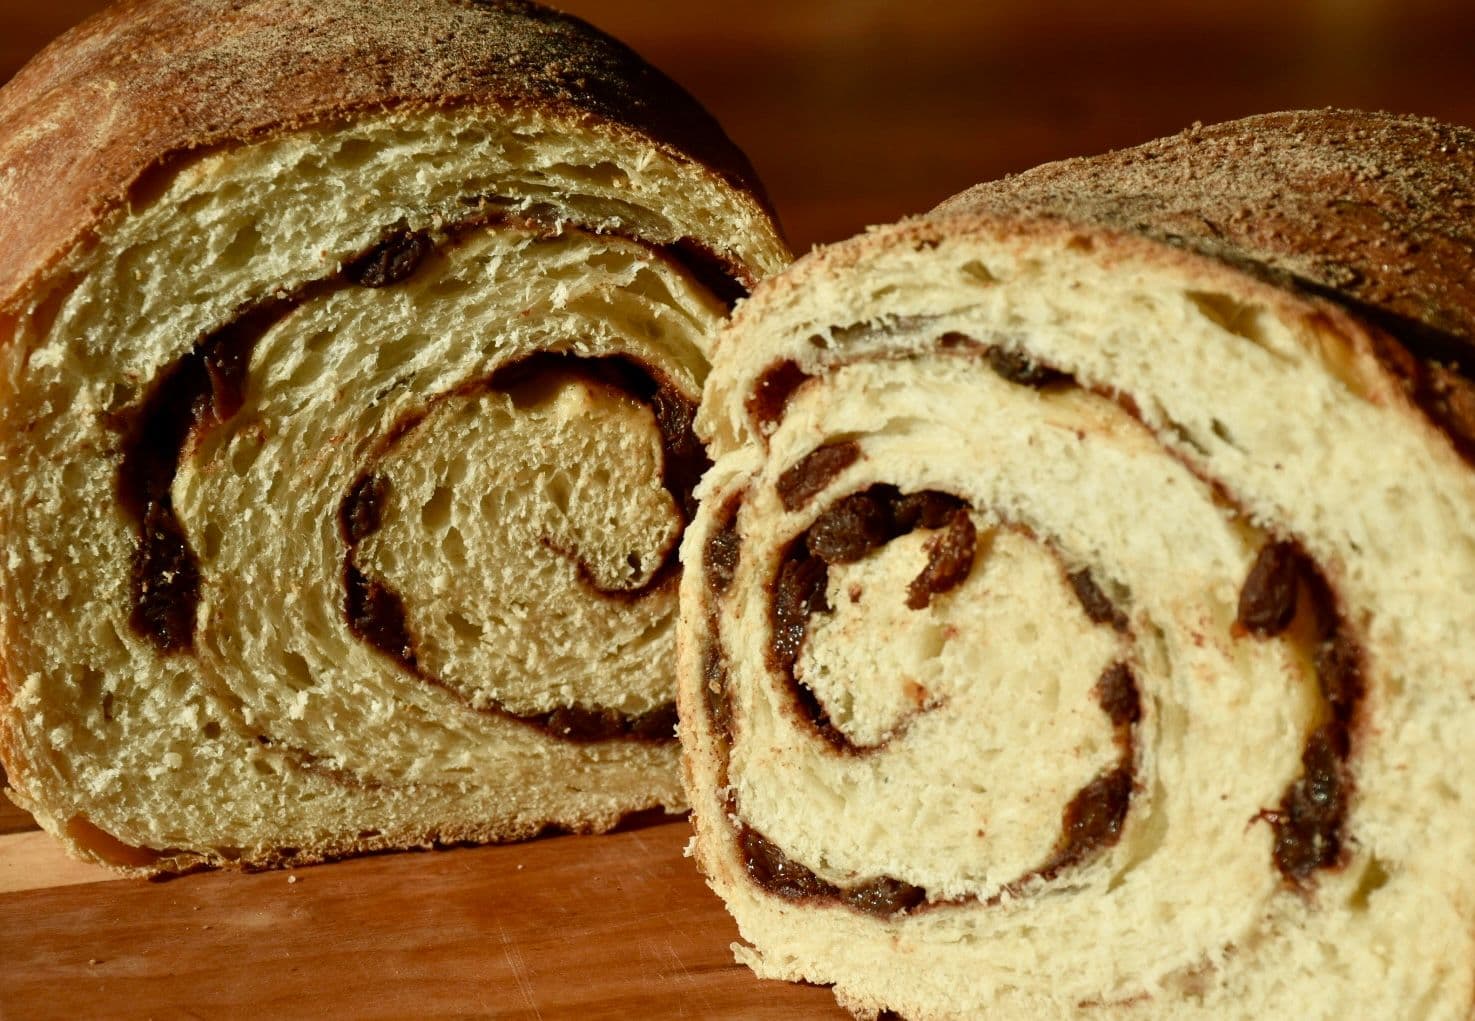
Easy Sourdough Cinnamon Raisin Bread (One Day, No Mixer)
February 21, 2026
If you've made my easy sourdough sandwich bread, this one is going to feel very familiar. It basically is that loaf, just with a cinnamon swirl and raisins tucked inside. My plain sandwich loaf is a crowd pleaser in our house, but I wanted to see if I could take it one step further and turn it into something that felt a little more special. The kind of bread that makes your whole kitchen smell like a bakery and gets eaten so fast you barely get a slice yourself.
This is that loaf.
My kids absolutely lose their minds over this one. It makes the best breakfast toast, tastes incredible slathered in butter straight from the freezer-to-toaster, and is honestly one of those things that sounds way more impressive than it is to make. If you can make the sandwich loaf, you can absolutely make this.

A couple of things I want to be upfront about before we dive in: getting a beautiful, tight swirl in sourdough takes a little more intention than a regular bread. The filling can create gaps, the raisins can dry out the dough, and the cinnamon sugar can actually cause the layers to separate if you're not careful. I've made all the mistakes so you hopefully don't have to. I'll walk you through everything, including a troubleshooting section at the end, because I genuinely want you to pull this loaf out of the oven and feel proud of it.
Let's do this.
*this post contains affiliate links, in which I may earn a small commission at no extra cost to you-thanks for the support*
Why This Works (and What's Different from the Base Recipe)
This loaf uses almost the exact same dough as my sandwich bread. The only change is one extra tablespoon of flour in the dough itself. That small addition gives the dough just a touch more structure to hold up against the filling.
The real magic is in the details of the filling and the shaping:
The milk and flour paste — Before you add anything else, you're going to brush the dough with milk and sprinkle a teaspoon of flour over it, then brush again with milk. This creates a thin paste that acts as glue and helps the filling actually bond to the dough layers. It sounds like a small thing, but it makes a big difference in whether your swirl stays intact or slides apart.
Flour in the cinnamon filling — Cinnamon and sugar naturally pull moisture from the dough during fermentation and baking. That moisture has to go somewhere, and without anything to absorb it, it creates gaps, tunnels, and sometimes a collapsed swirl. The small amount of flour in the filling soaks up that extra moisture before it causes problems.
Soaking the raisins — Same idea. Raisins are little moisture-suckers, and during a long sourdough ferment, they will pull hydration right out of your dough if you add them dry. A quick soak in hot water plumps them up and stops that from happening. Don't skip this step.
Tight rolling — This one is all technique. Roll it tighter than feels natural. Firm tension during shaping is what keeps the swirl from unraveling in the oven.
Ingredients
For the Dough
(Same as the sandwich loaf, with one small change)
- 4 cups + 1 tablespoon all-purpose flour (488g)
- ½ cup active sourdough starter (120g)
- 2 teaspoons salt (12g)
- 1 cup lukewarm filtered water (240g)
- 4 tablespoons melted unsalted butter (56g)
- 1½ tablespoons honey (32g)
For the Cinnamon Swirl Filling
- ¼ cup packed brown sugar (50g)
- 1 tablespoon ground cinnamon (8g)
- 1½ tablespoons all-purpose flour (12g)
- ¼ teaspoon salt (1.5g)
For the Adhesive Layer
- Milk (just a few tablespoons — enough to brush the dough)
- 1 teaspoon all-purpose flour
For the Raisins
- ¾ cup raisins, soaked and drained (about 115g dry)
Equipment
- Large mixing bowl
- Danish whisk
- 9×5 inch loaf pan
- Parchment paper
- Plastic wrap or damp dish towel
- Wire cooling rack
- Pastry brush (or just a spoon works in a pinch)
- Paper towels (for patting the raisins dry)
- Small bowl (for mixing the filling)
Instructions
The Night Before: Feed Your Starter
Feed your starter at a 1:10:10 ratio the night before. This slow rise peaks overnight and has it ready to go right when you need it in the morning.
Planning a two-day loaf? Feed your starter normally in the morning instead, and after the bulk ferment, cover the dough and stick it in the fridge overnight. Pull it out the next day, let it come to room temp for about an hour, and pick up at the shaping step.
Step 1: Mix the Dough

In the morning, combine your starter, lukewarm water, melted butter, honey, and salt in a large bowl. Mix with a Danish whisk until well incorporated. Add all of your flour (remember — 4 cups plus 1 extra tablespoon for this version) and mix with the whisk. Once it gets too thick, switch to wet hands and work it until all the flour is hydrated and everything comes together.
Step 2: Autolyse
Cover with a damp dish towel and let it rest for 30 minutes. The flour absorbs the water and the gluten starts developing on its own without any effort from you.
Step 3: Stretch and Folds
Do 3–4 sets of stretch and folds, spaced 30 minutes apart. Grab one side of the dough, stretch it up, fold it over to the other side, rotate the bowl, repeat on all four sides. That's one set. Cover with your damp towel between each set.
Step 4: Bulk Fermentation

After your last set of stretch and folds, cover the bowl and let the dough bulk ferment for roughly 6-8 hours. Don't just go by the clock, try to go by the dough. You want to see roughly a 50% increase in size. Warmer kitchens go faster, colder kitchens go slower. Look for dough that's puffy, slightly domed, and starting to show some bubbles.
Step 5: Mix Your Filling and Soak Your Raisins

Toward the end of the bulk ferment, mix together your brown sugar, cinnamon, flour, and salt in a small bowl until well combined. If you want to save a small pinch to sprinkle on top right before baking, set that aside separately (it bakes up into a lovely little cinnamon crust).
Then get your raisins going: place them in a bowl, cover with hot water, and soak for 10–15 minutes. Drain very well and pat dry with a paper towel or clean kitchen towel. They should be plump and moist but not wet or dripping.
Step 6: Shape the Loaf
Grease your 9×5 loaf pan with butter and line the bottom with a cut rectangle of parchment paper.

Turn your dough out onto a lightly floured surface. Using your hands, gently press it into a rectangular shape, using your loaf pan as a guide for the width. Release the large air bubbles as you go, but don't over-handle. Those small bubbles are what give you a good crumb.
Now here's where this loaf differs from the plain sandwich bread:
Once you have your rectangle shaped, brush the surface of the dough generously with milk. Sprinkle 1 teaspoon of flour evenly over the milk-brushed dough, then brush again with another layer of milk. This creates a thin paste right on the surface and this is going to be your adhesive. Let it sit for just a moment while you grab your filling.

Sprinkle the cinnamon filling evenly over the dough, leaving about a ½-inch border around all the edges. Then scatter your drained raisins evenly over the filling, staying within that same border. Gently press the filling and raisins into the dough with your fingertips. You don’t have to press hard, just enough to encourage everything to stick.
Starting from the short end, roll the dough up tightly into a log. Tighter than feels necessary. Seriously, go tight. Once it's rolled, pinch the seam firmly closed and pinch the ends as well. Place the loaf seam-side down into your prepared pan.
Step 7: Final Proof


Cover the pan with plastic wrap or a damp towel and let it proof for 2-3 hours. You want the dough to look puffy and to have filled out into the corners of the pan. The poke test still applies here: press gently with your finger and it should spring back slowly. Cinnamon swirl loaves can be a little more delicate than plain sandwich bread, so pay attention to this step. If it springs back fast, give it more time. If it doesn't spring back at all, it's overproofed.
Step 8: Bake
Preheat your oven to 375°F (190°C).

If you reserved a pinch of the cinnamon filling, sprinkle it over the top of the proofed loaf right before it goes into the oven.
Bake for 40–45 minutes. Because of the cinnamon filling plus the honey and butter in the dough, this loaf is prone to browning fast on top. Keep an eye on it and tent loosely with foil if the top is getting dark before the inside is done.
The loaf is done when the top is deep golden brown, the crust feels firm (not soft or springy) when pressed, and it sounds hollow when you tap the bottom. If you're on the fence, I dig baking 5 more minutes. Cinnamon swirl loaves forgive overbaking far more than underbaking.
Step 9: Cool

Let the bread cool in the pan for 5–10 minutes, then turn it out onto a wire rack. Let it cool for at least 1.5 to 2 hours before slicing (longer than the plain loaf). I know it's painful. But the cinnamon sugar filling holds onto moisture and the interior needs more time to fully set. Cutting in too early almost always means a gummy crumb, and all your hard work deserves a clean slice.
Tips and Tricks

- Soak the raisins every time — Don't skip it even if you're tempted to. Dry raisins will pull moisture from your dough during fermentation and create dry pockets in the finished loaf.
- The milk-flour paste is the secret weapon — It's what actually bonds the filling to the dough layers and keeps the swirl from separating. Don't skip that step either.
- Roll tighter than feels right — The dough springs back a little and the filling compresses during baking. What feels too tight usually comes out perfect.
- Leave a clean border — That ½-inch border around the edges is not just aesthetic. It gives you something to grip when rolling and keeps the filling from oozing out the ends when you pinch the seam.
- Flour in the filling is not optional — It absorbs the moisture that the cinnamon sugar pulls from the dough. Without it, you're much more likely to get gaps and a collapsed swirl.
- Go by the dough, not the clock — This applies to both the bulk ferment and the final proof. Kitchen temperature changes everything.
- Poke test for the final proof — Slow spring-back means ready. No spring-back means you've gone too far.
- Tent early if needed — The cinnamon on top burns before the inside is done. Check it around the 25-minute mark and tent if it's browning fast.
- Wait to slice — At least 1.5 to 2 hours. If you're still getting a gummy center after the loaf has fully cooled, bake an extra 5 minutes next time.
Troubleshooting

I've made every mistake possible with this loaf, so hopefully you can skip straight to the good part. Here's what I've run into and what helped:
The loaf is gummy even after it's fully cooled. Most likely cause: underbaking or too much moisture from the cinnamon sugar filling. Let the loaf cool completely (I'd say at least 1.5 to 2 hours minimum) before calling it gummy. If it's still gummy after fully cooling, bump your bake time by 5–10 minutes next round. It's wild how much of a difference that short window makes with this particular loaf.
There's a large gap or hole near the top of the swirl. Most likely cause: the cinnamon sugar melted and separated during oven spring, or the swirl layer didn't fully bond to the dough. The fix is that milk-flour paste step before you add the filling. If you did it and still got gaps, try pressing the filling more firmly into the dough before rolling, and make sure you're rolling tightly from the start.
The swirl is pulling away or creating tunnels. Causes are usually an overly wet filling or loose shaping. Make sure your filling has enough flour in it to absorb moisture, leave a clean border around the edges, pinch that seam as firmly as you possibly can, and roll tighter next time.
The raisins feel dry or are creating empty pockets. This almost always comes back to not soaking long enough, or not patting them dry well enough after soaking. If they're dripping wet when you add them, they'll steam in the oven and create pockets. If they weren't soaked at all, they'll absorb moisture from the dough and shrink up. Soak, drain well, and pat dry, that's the trifecta.
The loaf is splitting along the swirl. You may have slightly underproofed before baking. Make sure the dough is genuinely puffy and filling out the corners of the pan, and that the poke test shows a very slow spring-back. This loaf is more delicate than plain sandwich bread, so a little extra patience in the proofing stage goes a long way.
Storage
Freezer (my favorite method): This is actually how I prefer to store this loaf. Once it's completely cooled, slice it all the way through, then flash freeze the slices before bagging them up. To flash freeze, lay the slices out in a single layer on a baking sheet (make sure they're not touching) and pop them in the freezer for about an hour. This step freezes each slice individually so they don't stick together in the bag, which means you can pull out exactly one or two slices at a time without fighting a frozen brick. After that hour, transfer them to a freezer-safe bag and store for up to 3 months. Toast straight from frozen, no thawing needed. My kids love having it ready to go, and I love that breakfast is basically done before I've had my first sip of coffee.
Counter: If you want to keep it on the counter, store it wrapped in a bread bag or beeswax wrap at room temperature for up to 3–4 days. The cinnamon sugar filling can make it feel slightly stickier on the cut side, so wrap it well.
Fridge: Skip it. Refrigerating bread speeds up staling. Freezer or counter are your best bets.
This loaf has quickly become a staple in our house, right up there next to the plain sandwich loaf. Once you get the hang of the swirl technique, it really isn't much more work, and the payoff is massive. My kids ask for it constantly, and I love knowing that when they grab a slice of toast in the morning, it's real, from-scratch bread made with ingredients I can actually pronounce. That's the whole point of this around here.
Happy baking, friends.
Recipe: Easy Sourdough Cinnamon Raisin Bread (One Day, No Mixer)

Prep
~10 hours (~45 min active)
Cook
40–45 min
Ingredients
Dough
Filling
Also
0 of 13 ingredients checked
Instructions
- 1Night before: Feed starter 1:10:10.
- 2morning: Mix dough (starter, water, butter, honey, salt, then flour). Autolyse 30 min.
- 33–4 sets of stretch and folds, 30 min apart.
- 4Bulk ferment ~6 hours until ~50% rise.
- 5Toward end of bulk ferment: Mix filling. Soak raisins in hot water 10–15 min, drain, pat dry.
- 6Press dough into rectangle using loaf pan as width guide.
- 7Brush with milk → sprinkle 1 tsp flour → brush with milk again (paste).
- 8Sprinkle filling, scatter raisins, press gently, leave ½-inch border.
- 9Roll tightly from short end. Pinch seam firmly. Place seam-down in greased/lined 9×5 pan.
- 10Proof 2-3 hours until puffy, fills corners, slow spring-back on poke test.
- 11Sprinkle reserved filling on top. Bake at 375°F (190°C) for 40–45 min. Tent with foil if browning too fast.
- 12Cool in pan 5–10 min, then wire rack for at least 1.5–2 hours before slicing.
- 13To freeze: slice, flash freeze on baking sheet 1 hour, transfer to freezer bag. Toast straight from frozen.
Made this recipe?
I'd love to know how it turned out! Your rating helps other mamas find the best recipes.
Rate & ReviewRate & Review This Recipe
Be the first to rate this recipe!
Enjoying this post?
Get more from-scratch recipes and kitchen tips delivered to your inbox weekly. Join 35,000+ families already following along!